.....come enjoy some handmade creations and heartfelt experiences. I'm glad you're here & hope you'll come back often.

Tuesday, February 14, 2012

Happy Valentine's Day!!

Just wanted to wish everyone a Happy Valentine's Day! Hope you're sharing a little love with all the loved ones in your life!  Because you'll be sharing time with your loved ones today, thought I'd just quickly share a couple cards with you that I sent out.

These are cards I "started" last year at our local Stampin Up monthly workshop. We do fairly simple projects because we do a lot of socializing too (often so much socializing, that we don't finish - lol!)  I decided to finish these up this year & send them off to my loved ones.


 You can't see it too well, but there's lot's of dimension.  Both the heart and the banner were hand cut and popped up individually. You might be able to see a little better in this view. (Remember you can click any of the images for a better view).


The second card is very straight forward - an adorable little stamp that reminds me a bit of what I was probably like when I was little (thus I sent this one to my parents!)  Normally I work with Copics or pencils & Gamasol, but this time we were working with watercolor pastels - a very soft look. When I finished it up, I grabbed my Quickie Glue Pen and added a bit of SNS glitter to her dress and bow.  Then I used SNS brushable glue to sparkle up her pretty heart! (Gotta get that glitter in there!)  I desperately wanted to ad some brads or rhinestones or something in the corner, but I've been having problems getting those to go through the mail well.  I already had to pay extra to have the first one hand canceled because of the bow.  So I decided to forgo the extra bling on this one - I knew my parents would love it just as well anyway!


And there you have it - two sweet, simple little cards that my love ones are sure to appreciate.  Hope you have a very Happy Valentine's Day everyone!!

Until next time,
***Julie***
Supplies used:
Stamps - Stampin Up
Paper - Stampin Up
Punch - Stampin Up
Border Punch - Stampin Up
Glue & Glitters - Sparkle N Sprinkle 
                            (Bubble Gum, Sparkling Snow, Cerise)

Saturday, February 11, 2012

Spring Fling Blog Hop Winners & Another Spring Card!

Welcome back! I wanted thank everyone for stopping by & hopping along with us for the SNS Spring Fling Blog Hop!  We sooo enjoy sharing our creations with you & very much enjoy hearing from you all.  The winners have now been announced, so I thought I share the winners list with you in case you haven't been to the SNS blog yet.  Congratulations to all the winners!  And thanks again to everyone for stopping by!  (As promised, I have another design using the same stamp set that I used for the card you saw on the hop, so be sure to scroll down after the list to see that!)

Grand Prize #1:  Janet 33234  -  full-sized stamp set of her choice on cling
Grand Prize #2:  Stampnk – Stampette set of their choice on cling
1st Place: (from Angie’s blog)  JayBee46   - two glitter tinsels of her choice
2nd Place: (from Karalee’s blog)  Denise Bryant  - 3 small embossing powders of her choice
3rd Place: (from Barbara’s blog)  Cat Darling  -  3 small glitters of her choice


Ok then, on to another card.  For this month, I was working from a lovely set called Framed Florals.  Here's a look at the whole set:
 
There's so many beautiful things you can do with this set.  Since we were already in "spring mode", I decided to work with the crocus stamp too.  While crocus are definitely spring in my area (I hear there's a pretty pink version that's a fall bloomer though), this card would make a lovely thank you for any time of the year!
Focusing on the three main colors of crocus in my area, I wanted a nice soft look for this card.  (Kind of opposite of the bright & sparkly I went for in my hop card!)  The image was stamped with Grape Jelly Memento Ink and then colored with Copic Markers.  I love the look of stippling (there's another name for it, I just can't remember it) for the background.  It really adds to the soft feel of the colors.  Unfortunately, I think it looks a little "blotchy" in the picture, but I think that's mostly the angle of the picture.  I still really like the look though - a lot softer than a solid background would be.


The image was cut out & embossed with a Spellbinders Oval and then matted with two layers of Spellbinders Labels 18 and then attached with "pop dots" for a little height.  I can't remember whose corner punch I used on the white piece - gonna have to check that out & add that later.  But after punching out the corners; I stamped the Thanks message using the new Concord embossing powder from Sparkle N Sprinkle's new Tuscany embossing powder's collection - LOVE those!

Since I wanted the card base to be the soft butter yellow color; I decided to back the punched corner sections with purple (instead of just letting the yellow show through) for even more contrast.  You can back just the corner pieces themselves, but I decided to back the entire white piece for a little extra dimension.   The whole piece was then mounted to the yellow card base.   I really like the finished look - very soft & springy - just like I was shooting for!!  Always nice when that happens - lol!!  Hope you enjoyed this card too! 

This is such a lovely stamp set to work with; I'm sure I'll be bringing it out many times again. I know I definitely want to play with the other images I haven't used from the set yet.  If only we had more hours in the day!! Well, thanks so much for stopping by and I hope you enjoyed today's card!

Until next time,
***Julie***
Supplies used:
Stamps - Sparkle N Sprinkle
Embossing Powder - Sparkle N Sprinkle
Dies - Spellbinders Paper Arts
Corner Punch - ?
Markers - Copic

Wednesday, February 8, 2012

Sparkle N Sprinkle Spring Fling Blog Hop

Welcome to my stop on the SNS Spring Fling Hop!  Hopefully you're arriving here from the delightful Karalee's Blog.  If not, you may want to hop back to the SNS Home Blog to start at the beginning and get all the details about this month's hop.  As always, great prizes are being awarded - so do hop along with us for a Spring Fling!

For this hop, I have a "Springy" floral card with one of my favorite techniques for Wow factor - I hope you agree! This beautifully sparkly Stained Glass effect is created using the Glitter on Acetate technique from the Sparkle N Sprinkle Tips & Techniques section.   And this time it comes with a little surprise twist.....


After stamping the image from the Framed Florals - Stamp Set 370 onto acetate with Staz On ink, glitter is "painted on" to the image using SNS's great Brushable Glue.  While it's white while you work, the glue turns completely clear when dry revealing all the beautiful, shimmering colors in your "glitter painting".  Sparkle N Sprinkle has soooo many beautiful colors to pick from - your glitter painting palette is endless!  But here's the little twist.....


You're not restricted to just glitter when you use this "Glitter on Acetate" technique!  Sparkle N Sprinkle also has oodles of beautifully sparkly embossing powders too!  On this card, I chose to use the extra sparkly Royal Purple Embossing powder for the purple flowers & the arches on the top of the acetate piece.  It's applied exactly the same as the glitter & looks just as great as the glitters do!  Now just to be clear, don't heat it like you normally do with embossing powders - lol.  Just adhere it with the brushable glue and let the glue dry - just as you would with the glitters.  And wellah! you have another great way to use all those pretty embossing powders from SNS!  In this card, the royal purple EP was just as sparkly as the glitters I used.  But perhaps you'd like to do a project where some of your piece is sparkly and some of it is a more matte look.  You can also chose one of SNS's many embossing powders without glitter. It's a great way to create lots of contrast in a "Stained Glass" piece.
(Don't forget you can click on any picture for a better view or click on any bold text to get further info on the SNS site.)


It's so much fun to play with with all the beautiful glitter colors from SNS.  And now that you know this little tip, be sure to consider all the wonderful embossing powder choices for this technique too!  When you're looking for something extra special for that special someone - this technique is always a winner!  If you haven't already, be sure to try this out & have fun with it!

Now hop on over to Jill's Blog where there's always fun & interesting things awaiting you.  There's lots more Spring Fling ahead for you.  Don't forget to leave a comment before you hop on by and then enjoy the rest of the hop!  Thanks so much for stopping by!

Until next time,
***Julie***

PS - Stop back on Saturday to see the list of winners from this hop and I'll have another fun and "Springy" card for you from this same stamp set to share as well!  Better yet, become a follower & don't miss any posts!

A Favorite Guy Card

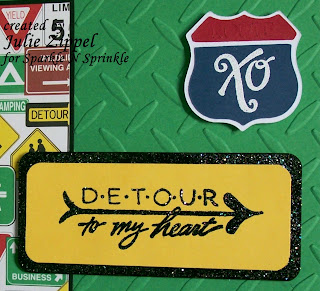
Hi Everybody! With Valentine's Day fast approaching, I thought I'd share one of my favorite "guy cards" for the holiday.  You have to admit, lots of guys don't go for all the red and pink - the ribbon and frills.  So I found a way to spread the love without all the "traditional"  hearts & flowers.  Here's a great way to get your message across with a "guy" twist.

This fun card was designed around Sparkle N Sprinkle's Love Is Sweet - Set 401.  

Using two stamps from the set, I created a couple fun street signs for this masculine card.  (Remember, you can click on any image for a better view).  The route sign was made using a Cricut and then stamped with the XO which was embossed with white detail embossing powder.  The detour sign was hand made.  It was stamped and embossed with Midnight Madness embossing powder.  For extra "oomf" (a technical term - lol), the black piece behind the sign was also embossed with Midnight Madness before it was layered behind the yellow.  Midnight Madness is a great dark embossing powder that has enough sparkle to make the card special without being too sparkly "for the boys".


I finished the card off with a fun street sign designer paper and my favorite guy embossing folder - diamond plate.  What a great way to let the guys in your life know how much they mean to you on Valentine's Day.  Or how about using this for an anniversary card or anyday!  Hope you enjoyed my card!

Until next time!
***Julie***

Supplies Used:
Stamps - Sparkle N Sprinkle
Embossing Powder - Sparkle N Sprinkle
Embossing Folder - Cuttlebug
Die cut (Interstate Sign) - Cricut
Designer Paper - Hot Off the Press/Paper Pizazz

Don't forget! The Sparkle N Sprinkle Spring Fling Blog Hop starts tomorrow; so be sure to stop back for that (great prizes, great spring ideas, great company) - See you then!