.....come enjoy some handmade creations and heartfelt experiences. I'm glad you're here & hope you'll come back often.

Sunday, July 22, 2012

Cool, Refreshing Hugs


Let's take a trip under the sea!
It sure has been a HOT & DRY summer in my part of the US; so I thought it would be be fun to take a trip under the sea for some refreshing hugs!  Ok, in reality, our temps finally took a dip recently and were wonderfully comfortable for a couple days.  And we got some very desperately needed rain for  a couple days; so we're thrilled  that the farm has had at least a couple days to come out of the burning drought.  We'll take it!!

So, on to my card!  This is one of my favorite SNS stamps  Little Darien.  I just love this stamp because every time I look at her, she just makes me smile!  And that's why I thought it would be perfect for a card that you could use for wide variety of occasions. Whether it's for a birthday, anniversary, thinking of you, or even a valentine; this cute little mermaid makes such a sweet card.  And it works equally well for both children and adults!  
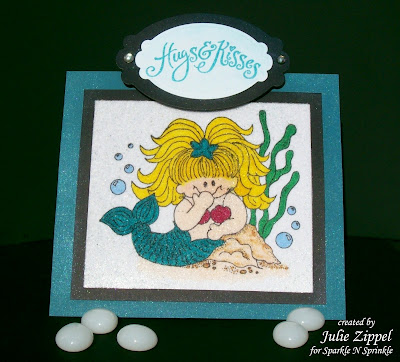


When I look at this cute little mermaid; sometimes I think she looks like she's giggling.  But then I also think it looks like she's blowing a kiss.  So with that in mind, I decided to use this pretty Hugs & Kisses stamp with her.  I think they look perfect together and it"s a versatile saying that makes the card appropriate for so many different occasions.  


Copic markers were used to color the image because I wanted something really vibrant.  And you'll have to forgive, this was very early in my Copic collecting & experience; so there's only a bit of shading & tones.  In all fairness though, I probably only had about 12 markers at this point & almost no collections of shade groups.  And besides, it certainly did come out nice and bold like I wanted.  But I do love this stamp and am going to have to do it again now that my Copic collection has grown large enough to allow tones & shades.  It's definitely on my to do list!


To add a watery feel to the card, the entire image was covered in Tear-ific Sheet (also called Super Adhesive Sheets) and then covered with clear microbeads. The tiny beads reflect and distort as you move the card; making it look much like you're looking through water.  In this second picture, you can see the beads a bit better and how they create this look as you move the card.

I also added an unusual touch to the whole card that takes advantage of a unique characteristic of the embossing powder I used for the saying.  By the Lake embossing powder is one of Sparkle N Sprinkle's Cosmic Embossing powders which has an extremely fine sparkling component to it.  When embossing with this powder, sometimes it will leave a small amount of excess sparkle or a "halo" around where you emboss.  This halo can be easily removed with a dusting cloth (a Swiffer cloth works really well).  But in this card, I decided to take advantage of this unique characteristic.  Instead of removing the sparkling halo, I not only left it in place; I poured even more embossing powder over all of the edges of the card for a little extra sparkle!  
Now, you have to bear in mind that this will slowly wear off as it's handled. But it will certainly stay in place long enough to be given to your recipient and for light handling.  And if you really wanted that look to be permanent; I'd bet you could spray it with an art fixative.


I just love this cute little mermaid & do think it made a really fun, bright, and versatile card.  I hope you enjoyed the card & Little Darien as much as I do!  Full instructions for this card can be found in the SNS Art Gallery Here.  Thanks so much for stopping by and don't forget to leave a quick comment so I know you were here! 

Until next time,
***Julie***

Monday, July 16, 2012

Another Chance to Win

OMG - I got so caught up in the Sparkle N Sprinkle Blog Hop last week that I totally forgot something very important when I put up my "post-hop" card!  That design (see below/Sat.'s entry) was meant to remind you that you have yet another chance to win a great SNS stamp set of your choice if you enter this month's Sketch Challenge!

Here's the sketch:


All the details for joining in on SNS's Monthly Sketch challenge can be found on the Sketch Challenge Tab on the SNS Blog (click here to go directly there)!


And here's what I did with the sketch:


I kept my layout very close to the sketch - keeping the overall square shape, the large circle focal point and the decorative background strip.  Basically, all I changed was to rotate the sketch 1/4 turn and eliminate the rounded ends on the strip.  This is such a great sketch for when you really want your main image to be the focal point of the card!  And that's exactly what I wanted since I was adding a lot of details to my image.  More information and additional pics of this project can be found in my previous post (on Sat).

If you'd like to see what some of the other girls did with this sketch, click here to go directly to the July sketch page to see some more examples.

Now it's your turn!  Why not give it a try?!  There's so many great SNS images that scream to be the focal point of an awesome card!  Pick one out & join in on the fun!!  And don't forget, a SNS stamp set will be awarded to one lucky entrant!  We look forward to seeing what YOU come up with!!  I hope you'll join in on the fun!

Until next time,
***Julie***

Saturday, July 14, 2012

Christmas in July 2012 - Part 2

Hi Again Everybody!  Hope you got a chance to join us for the SNS Christmas in July Thurs & Friday!  We can't thank you enough for joining us and particularly for your heartfelt thoughts and comments!  You inspire & encourage us with each comment you leave and we really appreciate it!

Normally, I like to try to post the winners of the Blog Hop here on my blog and possibly an additional project related to the hop.  Unfortunately, I won't be "here" when the winners are announced, but I still wanted to have a "post-hop" project for you!  Hopefully, if I'm timing this right, the winners should have already been announced on the SNS blog & you can see if you're a winner by clicking HERE!  But if you do that right now, don't forget to come back to see another great project.

 So, let's get on to another "Christmas in July" project!  This sweet card is from another SNS Stampette Set, Christmas Basket - Set 442S 


The focus on this card is all about dimension - A beautiful stamp all on it's own; the Christmas Basket is  super neat done up with lots of dimension!


The first bit of dimension comes from lots of shading with Copic markers for a great base layer.


Then to really make it pop - I literally made it pop....pop out that is.  Two extra layers were stamped, colored, and added to the snowman.  Each was popped up so that he really has his hands over the edge of the basket and his head & hat even stand out beyond that.  Super dimensional!


The candy cane also went 3D by stamping an extra time in red (I also added some green stripes to it for extra color), cutting it out, and covering it with dimensional liquid (I used Diamond Glaze).  When dry, I actually tucked it into/through the basket and popped up only the top end to make it look like it was sticking right out of the basket.  Sorry the pic of it isn't that great (it's super shiny in person), but you get the idea.

And for a couple little extra dimensional accents, a teeny tiny bow was added to the tag and some small rhinestones to the holly.


I just love how all the pieces came together to really make this piece "stand out".  If you'd like some more info, full instructions for this card can be found in the SNS Art Gallery Here.

I sure hope you enjoyed this second "Christmas in July" card.  Don't forget to let me know what you think of today's project and I look forward to your next visit.  Be sure to stop back soon!

Until next time,
***Julie***

Wednesday, July 11, 2012

SNS Christmas in July Blog Hop

Welcome to my page on the Sparkle N Sprinkle Chistmas in July Hop!  So glad you could join us for some cool fun this summer!  Hopefully you've arrived here from Jill's Blog.  If not, you'll probably want to go to the SNS Home Blog for all the details and to start from the beginning.  We have lots of great holiday & winter ideas to share with you so you can cool off from the summer heat.  And don't forget there's five great prizes that will be awarded too!


I have a really fun shaped card for you today.  I just LOVE shaped cards!  I used Stampette Set 443S - Snow Family (on sale this month!) to make this great holiday snow globe card. 
Click any photo for a closer view

The main image was stamped with Memento ink and colored with Copic markers.  Then I added lots of glitter!    The snow & trims on the snow people were accented with a glue pen and Sparkling Snow glitter (a must have for any crafter!).  The snowdrifts on the tree and on the snow people's hats were done in Bridal glitter.  Bridal & Sparkling Snow are both "white" glitters; so I thought I'd give you a couple real quick pointers about their differences and where to use them.

Sparkling snow is semi-transparent & "super sparkly".  Bridal glitter is a bit more "white" since it's an opaque glitter and not quite so sparkly.  So.....Sparkling Snow worked perfectly where I wanted some of the stamp lines to show through & gave me lots of sparkle.  And the Bridal glitter was great for where I wanted to cover up parts of the image with "piles of snow"!  Perfect!

And then for the really fun part!!  To make this card really look like a snow globe; the snowflake layer was done on Embossable Acetate so it looks like glass! The snowflakes were stamped all over the outer edge of the globe and embossed with White Detail Embossing powder.  Since you will heat the powder to melt it; be sure you use Embossable Acetate or it will melt &/or shrink up like a "Shrinky Dink."  Trust me, I can vouch for that LOL!  I had another acetate near my work area and grabbed that first ......should have taken a pic - all twisted, curled, and tiny as can be now he he!  Guess I wasn't thinking on that one!

After you heat your snowflakes on the proper acetate, you'll turn the acetate over and attach it with the snowflakes facing in.  This makes it look even more like the snowflakes are inside the globe!  For the base & top piece, I added some brown cardstock that had been embossed with a wood grain embossing folder and highlighted with some brown ink.  The saying on the plaque was heat embossed with Clear detail embossing powder, cut out with a Spellbinders Petite Oval, and then accented with more Sparkling Snow glitter.  And then the front & back of the card was held together with the large snowflake brad at the top.

This is a really neat card to make for a special someone this holiday season.  Why not get a head start & make up a couple right now!  Full instructions for this card can be found in the SNS Art Gallery here. 

I sure hope you enjoyed today's project!  After the winner's are posted on the SNS blog Saturday,  I'll have another holiday card for you later that day using another one of the Snowmen Stampette sets!  So be sure to stop back for that.  Better yet, become a follower of my blog & you won't miss any posts!

Now hop on over to Shanna's Blog to continue with the hop and get some more great ideas!  Don't forget to leave a comment to let me know what you think and qualify for the prizes.  And Thanks so Much for stopping by!!

Until next time,
***Julie***

Tuesday, July 10, 2012

Time to cool down

Hot enough?  It sure has been scorching over so much of the US this summer already.  And it's not even August yet!  Fortunately, the temps finally dipped a little in my area yesterday - yeah! 

But if you're looking for a great way to beat the heat; don't forget Sparkle N Sprinkle is having a cool and crisp winter Blog Hop this week!
Come dance among the snowflakes and see some great holiday ideas so you can get a head start on this year's holiday cards & projects.  And don't forget, there will be some great prizes for 5 lucky hoppers too!  Everyone on the SNS Design Team is looking forward to sharing some time with you!  Come cool off with us this week!  We'll see you then!

Until next time,
***Julie***