.....come enjoy some handmade creations and heartfelt experiences. I'm glad you're here & hope you'll come back often.

Wednesday, September 19, 2012

Sparkle N Sprinkle Ghosts & Goblins Fall Frolic Blog Hop

BOO!
And welcome to my page on the Hop!  Hopefully you've arrived here from Shona's Blog and have been enjoying everyone's great fall designs!  If not, you may want to hop back to the SNS Home Blog to start at the beginning and get all the details about how to qualify for our great prizes too!  Don't forget you can click on any of the bold, colored words for links to the other blogs or for further information

For my first card, I used one of our newest Halloween stamp designs....and a definite favorite amongst the designers!  I have a feeling you have already (or will be) seeing more than one design using Celeste the Good Witch.  Not only is it a a new favorite among the staff; it's a beautiful stamp that is now available in both a cling mount rubber stamp or as a digital stamp if you prefer that type (or like instant gratification lol!)


I chose to work with Celeste from a digital stamp this time and printed her out around 3".  

If you're familiar with digital images, you might want to skip this paragraph.  If you've never worked with digitals before, don't be scared off by them.  This image is actually my first project using a digital image and I can assure you that it's quite easy.  In a nutshell, you'll take the digital image(s) that are sent to you after you make a purchase and save them to your computer (create a file on your computer to store all your "digis" - as they're affectionately called).  When you're ready to use the image - copy & paste the image into a Word Document or pdf file if you prefer.  Adjust the size or make any other edits you'd like just as you would any other image in Word.  Then print it off on your printer using the same paper you'd normally use for the type marker (or other coloring medium) you intend to you.  Be sure to let the ink dry thoroughly or heat set it if you'd like to use it right away.  If you're unsure, you can always test your paper & markers with a test image to make sure the print ink doesn't smear.  If the printer ink does smudge; see if you can try a different printer - most inks are compatible if left to dry thoroughly or are heat set.  Then just color & cut out by hand or better yet use one of the many great Spellbinder dies.  Finish by decorating/embellishing like usual!  (Digital images really come to life by adding glitter, flocking, or even embossing powder!)  It's really quite simple to work with digitals, but if you ever have any trouble; let us know - the staff & designers at Sparkle N Sprinkle are always happy to help!

Now, a little more about the card..... I had spent a lot of time coloring Celeste, so I wanted her to really be the main focus of this card.  Using a Step Card; she stands out front and center.  A touch of Sparkling Snow glitter on her outfit and in the starry sky gives all her beautiful colors even more "pop".  The sparkly Royal Purple embossing powder frames & accents her perfectly.  And the Magical Day saying is the perfect complement to the the beautiful Celeste.  To coordinate the rest of the card, touches of sparkling snow glitter were added randomly to the moons & stars in the designer paper and also around the saying piece.  Full instructions for this card can be found here.

click any image for a better view


My second design today is just pure FUN!  Perfect for kids of all ages - it's sparkling & colorful design will make anyone's Halloween extra fun.  Hocus Pocus which comes from the Wanda Witch Halloween set is colored with Copic markers and embossed with Midnight Madness embossing powderThe saying is cut out with what is actually the center portion of a Spellbinder Polka Dot Frame.  That's the part you'd normally remove so you'd only have an outer frame left.  But you know I love versatility and the size & shape was just perfect for this!   A little black baker's twine was added as an accent behind the saying.
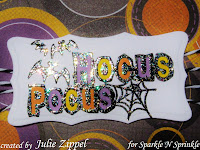


Look at All The Sparkle when you move it!

 
And for some final Halloween fun, I added the spooky eyes looking out all over the card.  Oh my, I just love the fun element they add to the whole look!  Full instructions for this card can be found in the SNS Art Gallery here.


I hope you've enjoyed yourself on my stop of today's hop and would love to hear what you thought of these projects.  Plus, Don't forget that commenting on every stop also qualifies you for the prizes!!  So leave a little comment and then hop on over to April's Blog - the next stop for the Fall Frolic!  Thanks so much for stopping by today!   I always appreciate your visits and hope you'll stop back!

Until next time,
***Julie***


Tuesday, September 18, 2012

Creative Thinking - Getting the Most from Stamp Sets

Did you get a chance to see my Spotlight Hummingbird card in the previous post?  If not, scroll down to the previous post or click here to take a look.....   Today's card uses the same Sparkle N Sprinkle stamp set.  But for a completely different look!

When I work with a stamp set, often my mind starts to wander.  And before I know it; I start thinking about all the "more unique" uses for different parts of the set.  If it's a dog set - I see parts that can be used for cats, a Christmas set - I see birthday card potential; and so forth.  Sometimes it's not a real stretch, but other times; it's way out there.  But it's always about getting the most out of each set - which is always a great idea!  So I let my mind go - make sure you let your mind go too!  (And no, don't tell me your mind's already gone....mine is frequently too - that's not what we're talking about here - he he!)

So anyway, with the Hummingbird set I used for the last post; you would immediately see - well, hummingbirds obviously, nature, beauty, and some lovely words.  What did I see - cupcakes! When I saw the words, I immediately saw a fun banner with a cupcake!  What do you think of my creative use?


click any image for better view

This time I used the Cappuccino and Cappuccino Star embossing powders from SNS's Tuscany Line  for the sayings & the cupcake.   Shamrock, Rosy Red, and Blue Jewel glitters give the banner extra color & lots of sparkle!  (It's even more sparkly in real life than the pics show!  But do click on the photos to see the sparkle a bit better.)  Papers are both from a 6pad from Studio G and are shaded around the bottom edges with two different distress inks.  The rick rack trim is some I bought in the sewing dept.

I think this makes a really colorful & fun birthday card.  Or maybe even a great card to send just for the fun of it to a friend with a sweet tooth or that's a chocoholic.  Lots of sparkle - lots of fun.


Here's a look at the full set:
What different uses do you
think of?
Stamp Set 452 - Hummingbird Party 
I hope you've enjoyed the two very different uses I chose for this set!  Leave a quick comment & let me know what you think!  Full instructions for this card can be found in the SNS Art Gallery here.  Don't forget.....Always think creatively - always try to get the most from your stamps!

Until next time,
***Julie***

PS - Don't forget to stop back on Thursday for SNS's Ghosts & Goblins Fall Folic Blog Hop!  As always, we'll have some fun projects & great prizes to share.  See you then!! 

Thursday, September 13, 2012

Spotlight on....Mini masterpieces & Two-tone Embossing

Recently I've seen a number of posts and discussions about Spotlight Stamping.  Spotlight stamping has been around for awhile, but it seems like it's making a comeback again recently.  It can make such a powerful statement on a project - highlighting & drawing your attention to a specific part of an image.

So, I thought I'd share one of the projects I did using this technique.  I absolutely LOVED this project & I'm not sure why I never got around to posting it before.  So this is the perfect opportunity!


First off, I LOVE crisp, clean black and white set off by a "pop" of color; so this was a perfect chance to go for that look too.

The card uses a beautiful hummingbird scene stamp from the Sparkle N Sprinkle Stampette Set 452S - Hummingbird Party.  Because I wanted to use the saying Smallest Things (from the coordinating Hummingbird set - Set 451 Hummingbirds & Flowers); I thought the Spotlight technique would be perfect to draw attention to just one little "smallest thing".  And I love how that look ended up working with the saying - just like I had hoped.

To get the look I wanted, I first embossed the outer panel with an embossing folder to give the card an elegant look.  Then I stamped the image in the center & also on a scrap too.


With a piece of black paper, I punched out the size circle my final colored image would be and used this to judge how much of the image on the scrap piece to color.  Since I knew I wanted one hummer to concentrate on, this was a great tool to use as I completed my "miniature masterpiece".  And a tiny little masterpiece it was......or at least I thought so!  For just this tiny little section of the image; I used almost 20 different Copic colors and spent almost an hour completing the coloring.  A little miniature work of art!  I was very pleased.
click any image to see closer


The image was cut out with a Spellbinder circle, backed with the next largest circle in black, and then carefully aligned with the rest of the image on the card front.
For the saying to the card, I wanted to coordinate with the beautiful pinks & purples of the flowers to balance the card out.  So I decided to do some two-tone embossing.  Concord & Mulberry embossing powders from the Tuscany Embossing Powder Collection were perfect for this.  (The concord photographed a little dark, but it's a rich and beautiful deep purple.)  By spooning on "lines" of one color of the EP first and then adding the second before melting the powders; you end up with a really eye catching and interesting element to add to the finished piece.  You can even control how much of each color you add if you use the spoons to add little bits of powder.  (On the sample on the right I added a bit more purple & a little less mulberry).  Well either way, I loved the look!  It's a neat technique that really finishes off the card perfectly!


If you'd like to see the full instructions for this card, they can be found in the SNS Art Gallery here.  Well, I hope you enjoyed this example of Spotlight Stamping.  For more examples & different things to try with Spotlight Stamping, be sure to check out all the ideas in the SNS Tips and Techniques Section on Spotlight Stamping.  If you haven't done any Spotlight Stamping or haven't done it in awhile....give it a try! 

Hope you enjoyed today's card & ideas!  Don't forget to leave a comment before you go - I always love to know that you stopped by and what you thought.

Until next time,
***Julie***