.....come enjoy some handmade creations and heartfelt experiences. I'm glad you're here & hope you'll come back often.

Thursday, February 28, 2013

March Creative Challenge at SNS

We've got a great new challenge for March over at Sparkle N Sprinkle!  This month we want to see you play with glitter - ultrafine glitter, velvet glitter, tinsel glitter, or even glittery embossing powder!  So many choices!!

This was a really hard challenge for me - ok, only in trying to decide which way I wanted to use it!  Soooo many different  ways I love to play with glitter - it was a hard decision!

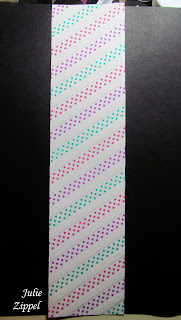
What I decided to do was combine glitter with one of the most popular paper supplies right now - washi tape!  And here's the results:


Love how the washi and glitter look together!  


To start, I chose three coordinating washi tapes and glitters for my piece. Then I began laying down alternating rows of washi and 1/4" Tearific Tape. ( I chose to cover a piece of cardstock larger than I needed so I would have enough for more than one project after I was done with the glittered piece.)

(click any photo for a better view)
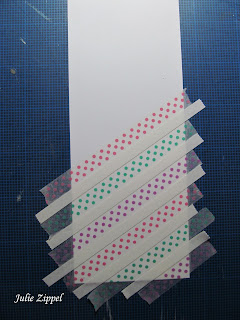


When the entire piece was covered; I trimmed all the tapes even with the edges and then burnished the washi & Tearific Tape down real well with a brayer (you could just use your finger to burnish it too).
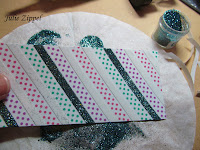


Then I began adding the glitter by removing the paper backing off of every 3rd row of Tearific Tape and covering the tape with one of the glitters.  I burnished the glitter well with my finger and brushed off the excess before moving on to the next glitter color.


After all the colors were added, I burnished everything one more time and then cut the washi/glitter piece to the size I needed for my card.  Doesn't it look awesome!

I've got a bunch more washi/glitter combo's I want to try out now! (All I need is to find the time lol!)  Here's hoping I find the time - this was a lot of fun and there's so many great options to try!!

 The background for the card was created with a great new Pansy stamp from the stampette set by the same name.  And the wonderfully fun Robin Williams saying (love this saying!) is part of the Spring Swirl stamp set.  For extra glittery sparkle, the saying was done in Mulberry Star embossing powder; which is an EP with glitter in it.  And the whole ribbon banner was outlined with one of the same glitters as the washi piece. Look at all that sparkle in the saying and banner!


A supply list and full instructions for this card be found in the SNS Art Gallery here.


Hope you liked all the glittery goodness in this piece!  And we sure hope you join us for this month's Creative Challenge at Sparkle N Sprinkle!  Here's a link to the Creative Challenge blog to get all the details!   Thanks for stopping by today and don't forget to leave a little comment so I know you were here - I read and appreciate every one!
Until next time,
***Julie***

Wednesday, February 13, 2013

Sparkle N Sprinkle Feb Monochromatic Blog Hop

Happy Valentine's Day!!


And welcome to Sparkle N Sprinkle's February Blog Hop!  If you've arrived here from Dawn's blog, you're in the right place!  If not, you may want to return to the SNS Home Blog to start from the beginning.  That way, you won't miss any of the great projects and you can catch all the detail on how to win some great prizes too!


Since so many people are stretching Valentine's Day into a long Valentine weekend this year (and why not?!) - I thought I'd do my monochromatic project in honor of Valentine's day!  So pop open that box of chocolates that you got and let's have a look at the project.


I decided to build interest into my monochromatic piece by combining a lot of different materials and textures.

The (dry) embossed piece was done with Mirror Red Cardstock and accented with Fire Engine Red Glitter. Using Brushable Glue, I accented half of the hearts by brushing the glue into the recessed hearts and then sprinkling them with the glitter.  The result is a really neat tone on tone (and sparkle on shine!) look.  Even though they're the same color; the smooth mirror cardstock and texture of the glitter offer a really nice contrast.  I LOVE how that piece turned out!!  And of course, it's even better in person! 


Take a look at all the shimmer and shine that bottom panel has!

(Remember, you can click any photo to see it better!)


The upper panel was created using the "XO" from Set 401 - Love is Sweet  This time the texture is created by embossing it with Firecracker Red  embossing powder to add just a little more texture.  The main saying was also done with Firecracker Red EP, but done on white to let the sparkle in the embossing powder come out more and give a little bit more pop to the greeting.  The greeting is from Stampette Set 453S - Happy Hearts. 
 

Flowers in varying shades of red and a felt heart were added to hightlight the saying.  And for a final touch of contrast, I added the matte look of the felt hearts and some bakers twine to the seam between to the two papers.


Well I hope you enjoyed my monochromatic magic!  Hopefully, you've still got some of your chocolates left for the rest of the hop lol!  Next up is Keri's blog; so hop on over to see what she has for you today!  (Don't forget to leave a comment to let me know what you think and qualify for the prizes).  Thanks for stopping by and enjoy the rest of the hop!!

Until next time,
***Julie***

Wednesday, February 6, 2013

SNS Monthly Challenge - New Challenges Await

Well Hello again!
 Wow, January has quickly slipped by already – hard to believe.  And February is already coming in like gangbusters around my place.  We had a busy & long first weekend in Feb. with the kids being off on Monday for a teacher in-service day this week.  So with them home an extra day; that meant a slow start to my week.  And it will be a busy week to boot.  It’s Valentine’s week around here!  Our school district always celebrates holidays on Fridays and they’ve decided that they want to celebrate before Valentine’s day instead of the day after.  So…..lots of Valentine preparations going on around here this week-  card’s, mailboxes, party games & treats are all the fare for us this week!  Busy times, but always special memories created for sure!

But here we are in February! And I don’t want you to forget about Sparkle N Sprinkle’s February Creative challenge going on all month; so I wanted to tell you a little about what I did for this month's challenge!


This month, SNS embarks on some new things with their monthly challenges; so you'll definitely want to be sure to go over to the Creative Challenge page to get all the details on what's new! 

One of the biggest changes though is that we will be hosting a wide variety of challenges instead of just sketches this year. How Fun!!


This month is the first non-sketch challenge and it focuses on a swatch from Design Seeds.


My take on the swatch was to take both the color (basically blues) and also the gradient in color that you see on the swatch.  Even though my gradient uses different hues; I wanted to build on having a gradient.  It's a little hard to see in my pic, but the glittery colors on the cross go from a rich dark navy in the center out to a soft pale blue near the edges.
Color swatch courtesy of Design Seeds®


For this design, I used one of my favorite SNS techniques - Glittered Stained Glass (video tutorial here March 2011) - it's also referred to as Glitter on Acetate and can be found in the SNS Tip & Technique section under that name. Or click the name to go right thereUnfortunately, the pics don't do it justice - bad time of year for that up here in the north - I need more SUN lol!.  But I have to say, the sparkle with this technique in real life is just phenomenal! That's why I like it so much ;-)!  

 
Now I have to admit, I don't always design my cards with something specific in mind; but this card was one of those exceptions.  I had a baptism coming up and I knew exactly what I wanted to do.  And this card was exactly what I had in mind!  (Everyone loved the card too by the way!  It was so pretty and sparkly; I decided to put it in a clear envie and attach it right to the front of the gift bag instead of putting it inside the bag!)


The other thing I liked about this card is with the versatile saying on it, you could mix up the colors and use it for SO many different special occasions - baptism, 1st communion, confirmation, weddings, even Christmas and Easter.  The possibilities are endless!  (And if you wanted something more specific for a communion or confirmation; the same set that these stamps came from also has two great sayings specific for those events)!

Here's a look at the whole set!  Set 362 - Crosses Floral


Ok, I better get back to those school Valentine's projects I should be working on! Hope you enjoyed today's card!  And I truly hope you'll join us for this month's Creative Challenge at Sparkle N Sprinkle!  We love seeing your work as much as we love sharing ours with you! Thanks so much for visiting today & don't forget to leave a comment so I know you stopped by!

Until next time,
***Julie***