Hi again! Hope everyone had a great 4th of July!
We actually just worked around the house on the 4th and didn't do anything special. But we did have a super busy post 4th weekend. The highlight was attending the Taylor Swift concert in Pittsburgh with my daughter & sister - my 1st concert in about 20 yrs. and my daughter's very first concert! It's not something we usually get to do because we're about an hour from the city (& concert venues) and tickets are sooo expensive (not in our budget!) But this was a special treat as my sister & family bought us tickets for our birthday & Christmas gifts last year. My daughter & I both have birthdays in November & with Christmas only a month after that; it was a special combined birthday/christmas present. I have to say we both really enjoyed it. It was a great show & who knows when we'll ever get a chance to do that again! Many thanks to my sister & family for that really special treat!
In any case, I kind of have a patriotic card for you today. But I specifically saved it until after the fourth because I didn't really intend it to be patriotic.....per se. How's that for a wishy washy explanation!
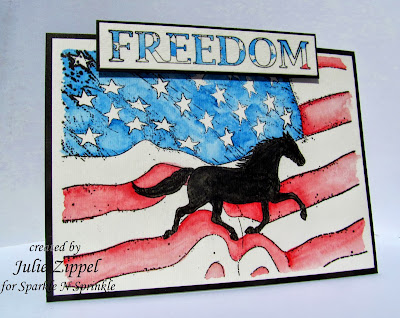
Actually, I thought this card
would be good for a patriotic card
OR a general multipurpose (note card, thinking of you, birthday, etc.) I have lots of friends with horses and I know any of them would
love to get this card
any time of the year. So, I guess that's where I'm reluctant to say it's only a patriotic card.
I have to say I'm ecstatic with how this turned out. One of those exactly how I saw it in my head cards! The horse silhouette, the bold red, white, & blue combined with the soft watercoloring. Love it! Love it! Love it!
(click any photo for a better view)
The inspiration for this card actually came from two places. I actually have a t-shirt with a similar design and thought that it would make a really great card idea. And the second inspiration.....if you've ever watched horses run; you can't deny how beautiful and free they look when they're running. So combining them with an enduring symbol of freedom is such a perfect combination!
The running horse is from the new SNS
Set 498 - Horses. LOVE this set!! The flag background & the word freedom are sold individually or on SNS's
Set 434 - Patriotic Background. Everything was colored with Inktense watercolors. With these, I was able to achieve the rich vibrant colors and yet still be able to control the opacity. I did one version with the horse silhouette very dark & opaque and a second lighter one (below) where the detail lines were still able to show through a little bit. Different effects, but I liked them both.

The lighter version of the card was also done without the Freedom saying at the top. After seeing the card
with freedom at the top; it probably looks a bit plain without it. But I thought omitting it made it look a little less like a card for a patriotic holiday & more for use anytime of the year for a note card, birthday or something else for a horse lover.
Hope you like this card as much as I do. Full instructions can be found in my SNS Art Gallery
here.
Don't forget to stop back Friday or Saturday for SNS's Girly Girl and Macho Mania Blog Hop! Always some great inspiration and great prizes to be won too! Let me know what you think of today's card and I hope to see you again at the hop!
Until next time,
***Julie***


